

We help businesses accept payments online.
Founded in Tokyo in 2014, Paidy is a leading “Buy Now, Pay Later” (BNPL) service in Japan. Paidy simplifies purchases by requiring only a mobile phone number and an email address, with payments settled the following month.
As of 2021, Paidy has over 6 million users and is accepted at 700,000+ websites including Amazon and Apple Store. Its “3-Pay” feature allows users to split payments into three interest-free installments, enhancing convenience.
This article explores how Paidy works, its key features, and the benefits it offers to both consumers and merchants, providing a comprehensive guide to leveraging this innovative payment solution for your eCommerce store.
What is Paidy?
Paidy is a Japanese “Buy Now, Pay Later” (BNPL) service for online shopping. It allows consumers to make purchases and pay later, either in installments or as a lump sum, without needing a credit card. As Japan’s leading BNPL service, Paidy aims to build trust in society and provide financial flexibility to its users.

Features
Easy to Register & Use
Paidy does not require pre-registration or a credit card. Users can easily sign up and start using the service by entering basic information such as their email address and mobile number.
Pay Later in One Go
Customers can consolidate all their purchases made within a month into a single payment. This payment is due in the following month. This makes it easy to consolidate multiple purchases into one manageable payment cycle.
Flexible Payment Methods
This consolidated amount can be paid either via bank transfer, convenience store payments, or account transfer. The payment is typically due by the 10th of the following month.
3-Pay Installments
One notable feature is “3-Pay,” which allows users to split their payments into three interest-free installments. This feature is handy for users who prefer spreading out payments rather than making a lump sum payment.
How Paidy Works
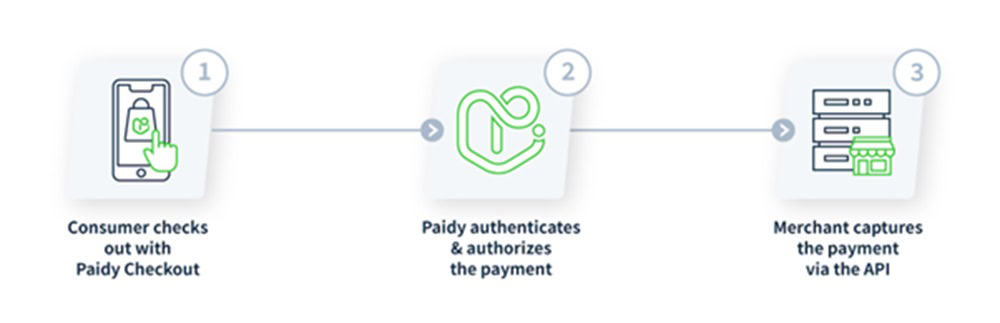
Paidy has two main components: Paidy Checkout and Paidy API.
Paidy Checkout
Paidy Checkout simplifies and secures online payments for both desktop and mobile users who are shopping at online stores. The app guides customers through the payment process step-by-step, ensuring a smooth and seamless checkout experience.
Paidy API
For merchants, the Paidy API offers secure payment management. It enables actions like completing payments, issuing refunds, and canceling transactions—all formatted in JSON (JavaScript Object Notation), a standard for data exchange online. JSON ensures reliable and efficient communication between the store and Paidy’s system.
How It Works
Imagine a customer shopping online and using Paidy Checkout to pay securely with just a few clicks. Behind the scenes, the store owner uses the Paidy API to manage these transactions seamlessly, providing a hassle-free experience for both parties.
How to Pay with Paidy
| Online Payments | In-person Payments |
| 1. Select Paidy at Checkout When checking out at an online store, choose Paidy as your payment method. | 1. Select Paidy at Checkout When checking out at the store, choose Paidy as your payment method. |
| 2. Provide Details Enter your email address and mobile number on the checkout page. If it’s your first time using Paidy, you may also be asked for your name and address. | 2. Receive Payment Code Enter your email address and mobile number on the checkout page. If it’s your first time using Paidy, you may also be asked for your name and address. |
| 3. Receive Authentication Code Paidy will send a 4-digit authentication code to your mobile phone via SMS. | 3. Visit a Convenience Store & Locate the Payment Terminal Go to a nearby convenience store that supports Paidy payments, such as Lawson, FamilyMart, or others. |
| 4. Enter Authentication Code Enter the authentication code on the checkout page to verify your identity. Additional information may be required. | 4. Enter Payment Code Use the terminal to enter the payment code you received. Follow the on-screen instructions to complete the process. |
| 5. Complete the Purchase Once authenticated, your payment is processed instantly, and you will receive a digital confirmation and receipt via email. | 5. Complete the Payment Pay the amount due at the counter. The cashier will confirm your payment, and you will receive a receipt as proof of payment. |
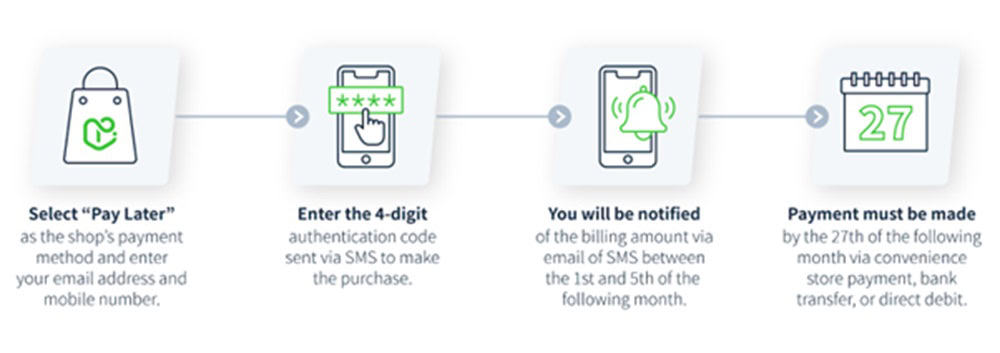
Billing & Payment:
- Billing Notification
Consumers are notified about the billing amount by email and SMS between the 1st and 3rd of the following month.
- Payment Deadline
Payments must be made by the 10th of the following month.
- Making Payments
Payments can be made via:
– Convenience store payment
– Bank transfer
– Account transfer
Token payments
Paidy’s token system simplifies how recurring payments, like subscriptions, are handled without requiring credit card details for each transaction. Paidy’s tokens can be integrated seamlessly into most e-commerce storefronts.
Benefits:
- No Need for Credit Cards: Tokens eliminate the need to enter credit card information repeatedly.
- No Expiry: Tokens do not expire, reducing issues with failed payments.
- Flexible Charging Options: Charge customers immediately or delay payments as needed.
- Customizable: Adjust the system to fit specific business requirements seamlessly.
How Tokens Work

1.Token Creation
– Customers select Paidy at checkout and verify their identity with a 4-digit SMS code.
– Paidy generates a token linked to the customer’s account, securely stored for future use.
2.Using Tokens
– Initiate payments through the Paidy API using the token.
– Payment authorization occurs during the creation of each transaction, ensuring secure and efficient processing.
3.Managing Tokens
- Suspend: Temporarily disable a token to prevent further use. Useful when resolving payment disputes or suspicious activities.
- Functionality: Suspended tokens can be reactivated later, maintaining customer convenience.
- Resume: Reactivate a suspended token when needed for ongoing transactions. Ideal for resuming subscriptions or regular payments.
- Flexibility: Tokens can be resumed by the merchant or the customer, depending on the situation.
- Delete: Permanently remove a token from the system if no longer required.
- Control: Deleting tokens ensures they cannot be used for future transactions, enhancing security and compliance.
4.Tokens API
The Paidy API provides functionalities to interact with tokens programmatically:
- Suspend: Temporarily disable a token to halt transactions.
- Resume: Reactivate a previously suspended token for continued use.
- Delete: Permanently remove a token from the database.
- Retrieve: Access details of specific tokens or lists of active and suspended tokens for administrative purposes.
How to add a bank account to Paidy
Consumers can add a bank account to Paidy for automatic payment processing. To add a bank account to Paidy, follow these steps:
1.Go to your account
– Open the Paidy app or website and log in to your account.
2.Access Payment Options
– Navigate to the “Payment Options” section in your account settings.
3.Initiate the Application
– Tap on “Apply.”
4.Agree to Terms
– Read the provided terms and conditions.
5.Enter Personal Information
– Type your name in English.
6.Select Your Bank
– Choose your bank from the provided list. Note that the procedures might vary depending on the bank.
7.Enter Bank Details
– Provide your bank details, including your bank name and other required information.
8.Double-check Information
– Verify that all the information you entered is correct.
9.Confirm and Submit:
– Tap the blue button to proceed.
10.Authenticate
– Enter your cash card password and log in.
11.Finalize the Process
– Complete any additional steps as prompted.
12.Confirmation
– Your bank account should now be successfully added to Paidy.
13.Automatic Withdrawal
– The billed amount will be automatically withdrawn from your bank account every month.
This transfer will be reflected in your usage history within three to five business days after the withdrawal date.
Benefits of Using Paidy for Customers

Using Paidy offers several benefits for customers, particularly in enhancing their online shopping experience. Here are the key advantages:
1. Flexible Payment Options
Paidy offers customers two options to pay: deferring payments to the next month with Single-Pay, and splitting payments into three installments with no additional fees through 3-Pay.
2. Convenient Shopping Experience
The new Paidy app features a “Shop & Discover” option enabling users to explore and find items across multiple online stores. Customers can seamlessly complete their shopping journey, from discovering products to making payments, all within the Paidy app.
3. Personalized Shopping
The app recommends stores and items based on user interests, allowing users to save favorite items and create wish lists for future shopping plans.
4. Smart Money Management
The app helps users manage their finances by giving them a clear view of their payment schedules and amounts due, allowing for a stress-free shopping experience without immediate financial pressure.
5. Exclusive Offers
Paidy provides exclusive deferred payment plans like the “Pay Anywhere Apple Exclusive” for Apple products, making high-value items more affordable and accessible.
Overall, Paidy provides a seamless and flexible payment solution that enhances the online shopping experience, making it more enjoyable and financially manageable for customers.
Benefits for eCommerce Merchants
1. Optimized for Smartphones
Integrating Paidy’s payment screen via JavaScript helps merchants reduce cart abandonment and improve checkout conversion rates. This seamless integration enhances the shopping experience, attracts more customers with deferred payment plans, and can boost sales and revenue.
2. Reduced Risk of Cancellation
Confirming payment at the time of purchase through Paidy reduces the risk of order cancellations due to cash on delivery refusals or recipient absence, ensuring smoother transactions and minimizing revenue loss for store owners.
3. Support for Recurring Purchases and Continuous Billing
Paidy facilitates seamless payments at any cycle and amount, ideal for subscription services. It ensures reliable cash flow and contributes to stable revenue stream and customer retention.
4. Easy Refund Processing
This feature benefits store merchants by simplifying the refund process, just like handling credit card refunds. It allows merchants to issue full or partial refunds effortlessly using the Paidy API, improving customer service and satisfaction, fostering loyalty, and potentially increasing repeat business.
5. Cost Efficiency
There are no initial setup costs; the only expense is the settlement fee.
6. Guaranteed Payment
Paidy guarantees payment upon completion, eliminating the risk of order cancellation for merchants.
Integrating Paidy with Your Online Store
Connecting Paidy to your eCommerce store typically involves a few key steps, including creating a Paidy account, obtaining the necessary API credentials, and integrating these with your store’s platform. Here’s a general guide:
1. Create a Paidy Merchant Account |
2. Obtain API Credentials |
3. Integration with eCommerce Platform |
4. Test the Integration |
5. Go Live: |
Connecting Paidy to Your eCommerce Store through KOMOJU
1. Prepare Accounts & Create Accounts
– Ensure you have a Paidy account.
– If not already done, create and verify a KOMOJU account.
– Visit the Paidy website to sign up for a merchant account and complete the verification process.
2. Access Payment Settings
– Log in to your eCommerce platform’s dashboard.
3. Select Paidy via KOMOJU
4. Enter Credentials
– Input your KOMOJU account credentials.
– Ensure the currency in your eCommerce account matches the currency in your KOMOJU account to avoid transaction issues.
5. Configure Settings
– Follow the platform-specific instructions to complete the setup.
– Configure any necessary settings for handling payments, refunds, and payouts.
6. Integration with different eCommerce Platforms
– The integration process can vary depending on your eCommerce platform. Here are some common platforms and general steps for each:
For Shopify | For WooCommerce (WordPress) | For Magento |
Go to your Shopify admin panel. | Install and activate the Paidy Payment Gateway plugin from the WordPress Plugin Directory. | Log in to your Magento admin panel. |
Navigate to “Settings” > “Payments”. | Navigate to “WooCommerce” > “Settings” > “Payments”. | Navigate to “Stores” > “Configuration” > “Sales” > “Payment Methods”. |
Select “Alternative payment methods” and choose Paidy from the list. | Find Paidy in the list of available payment methods and click “Manage”. | Find Paidy and enter your API credentials. |
Enter the API credentials obtained from your Paidy dashboard. | Enter the API credentials from your Paidy account. | Configure the settings and save the configuration. |
Follow the on-screen instructions to complete the integration. | Configure any additional settings as needed and save changes. |
7. Test the Integration
8. Go Live
– Once tested, start accepting payments via Paidy.
For detailed instructions on integrating KOMOJU with platforms such as Wix, Shopify, WooCommerce, or Magento, refer to their respective integration guides and help centers.
If you encounter any issues or need platform-specific guidance, consult KOMOJU’s documentation or contact their support team for assistance.
Summary
Paidy simplifies online shopping in Japan with its “Buy Now, Pay Later” service, available at numerous websites. Registration requires only a mobile number and email, offering features such as interest-free installments and consolidated monthly payments. Secure transactions through its Checkout and API, seamless integration for merchants, and a token system for recurring payments make Paidy an effective tool for enhancing eCommerce transactions in Japan.
If you want to explore Paidy in a free testing environment, sign up for free with KOMOJU or contact the KOMOJU sales team to learn more about integrating Paidy into your eCommerce setup.
FAQs
Here are some frequently asked questions about Paidy.
Paidy is a payment method that requires only an email address and a mobile phone number. No pre-registration or credit card is needed, and payments are consolidated into a single bill the following month, regardless of how often you shop.
In North America, similar “Buy Now, Pay Later” (BNPL) services include popular options like Afterpay, Klarna, and Affirm. These services also allow users to make purchases without upfront payment, often splitting the total cost into manageable installments.
Here are the steps to create a Paidy account and add an app:
- Download the Paidy app from the app store.
- Open the app and select “Pay Later (Paidy).”
- Click on “Add a new account.”
- Enter your name, email address, and Japanese mobile phone number, then click “Continue.”
- Choose an existing billing address or add a new one, then click “Agree and send one-time password.”
- Enter the verification code sent to your mobile phone and click “Confirm one-time password.”
TLS (Transport Layer Security) is an industry-standard protocol for encrypting network communications and verifying the identity of websites over the Internet. Both Paidy Checkout and the Paidy API support TLS versions 1.2 and higher. Additionally, HTTPS is employed to ensure all data is transmitted securely.
We help businesses accept payments online.